Can’t find the right answer?
Write us a message and we’ll get back to you as soon as possible.
All Lightkey editions—even the free edition—include the full set of features. The only difference is the number of DMX output channels and smart lights you can control. To find the right edition simply determine the total number of channels used by your DMX fixtures and the number of smart lights.
If you expand your lighting setup later, you can upgrade to a higher edition at any time.
Your Lightkey license determines the total number of DMX output channels. You can distribute them to any number of universes.
Licenses for smart lights enable output to up to 100 smart lights connected to any number of Philips Hue bridges. Otherwise output is limited to five smart lights.
The total number of DMX universes and Hue bridges must not exceed 31.
Versions before Lightkey 4 can control up to 2048 DMX channels. These versions do not support smart lights.
| Lightkey edition | Enables DMX output for… |
|---|---|
| Free | … the first 24 channels of one universe |
| 256 channels | … the first 256 channels of one universe |
| 512 channels | … a single DMX universe |
| 1024 channels | … two full DMX universes |
| 2048 channels | … four full DMX universes |
Lightkey licenses are always valid for one year. Lightkey warns you at startup if your license is about to expire within the next two weeks.
To renew the license, simply buy a new license in our online store. If your old license is still valid, enter its expiration date in the License Begin field so they don’t overlap. On that date do the following, depending on your Lightkey version:
To keep it simple, we don’t have user accounts and you don’t need to know your old license key to renew it.
You can upgrade your license to a higher edition at any time. When you do this you get a discount for the remaining value of your license. You can apply this discount to a new license which runs for another year. Please contact us and we’ll tell you the next steps and the exact amount of the discount.
Make sure to use the same email address you used for the original purchase, or include either your license key or original order number.
No worries: Simply enter the email address used to place your order, and we’ll resend your license key straight away.
A license can only be active on one computer at any time. However, you can move it to another computer easily and as often as you like. Note that if you want to use a computer only for preparing a show without actually outputting DMX, the computer doesn’t need a license at all.
If you want to use Lightkey on multiple computers at the same time, you need a separate license for each computer.
A license can only be active on a single computer at any given time, but can move it between computers easily and as often as you like. Follow these steps:
Lightkey remembers the license key if it has been activated before, so you can switch between computers more quickly.
You can no longer access the computer with the active license? Please write us a short message.
Sure! Lightkey can create a file which you can send to us from another computer with Internet connection. Simply follow these steps:
Please understand that we can only handle activation requests during our office hours.
No. Lightkey licenses are always valid for one year and all updates and support are free during that time. If you want to continue using Lightkey after that you need to buy a new license.
Why are licenses limited to one year? If we sold unlimited licenses, we’d unfortunately have to charge a much higher price. We believe that a time-based model is an ideal solution for everyone: You can try Lightkey at a low price for one year, and if you are not satisfied—which we don’t believe!—, you save a lot of money compared to a perpetual license.
On the other hand, this licensing model allows us to release updates much more often—which we do, as you can see in the Release Notes. Manufacturers with perpetual licenses often save new features for big, paid updates that appear in longer cycles.
Unlike other manufacturers, we don’t sell DMX hardware through which we subsidize our software. Instead Lightkey gives you the freedom to choose from a wide range of DMX hardware from various manufacturers, allowing us to put all our effort in creating the best lighting control software possible. That’s why we must charge a price for our software.
Please contact the FastSpring team (who handle payments for us) for questions about payment methods or checkout. FastSpring can help you with:
After buying a license we send you an email with your order details. It contains a link to your invoice:
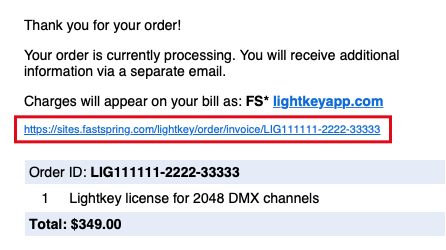
If you can’t find the email: Please contact the FastSpring team (who handle payments for us).
If you’re buying on behalf of an organization that is exempt from U.S. sales taxes we can either refund the tax after the purchase, or we can create a custom order that doesn’t include sales tax.
Please contact the FastSpring team (who handle payments for us) through the link below and include a copy of your tax exemption certificate and, if you already placed an order, your order number.
Here are the system requirements for the current Lightkey version. If your Mac runs an older version of macOS we also provide earlier Lightkey versions for download.
Lightkey works with any fixture that can be controlled through DMX. If there’s no profile for your lights in the fixture library we’ll be happy to create one for you. The library also contains generic profiles for simple kinds of fixtures, see Appendix 2 of the Lightkey User Guide. You can connect conventional lights with no DMX connector through a dimmer pack.
Lightkey can control bulbs, LED strips, plugs, and other types of lights of the Philips Hue brand. Products by other manufacturers which connect to a Philips Hue bridge will often work as well, but we can’t guarantee compatibility with them. Other smart light systems, including WiZ lights, are not currently supported.
Any DMX-compatible dimmer pack or switch pack will work with Lightkey. Simply patch several of the generic one-channel profiles (e.g. PAR Wash, PAR Spot, Bulb, Switch) to consecutive channels. Each light appears as a separate fixture in Lightkey’s Preview.
Lightkey works with a number of DMX–USB interfaces from various manufacturers. Here’s the full list. If your USB interface is not on the list then it’s most likely not compatible. Lightkey also works with any interface that uses either Art-Net or sACN.
Lightkey works with both kinds, and it doesn’t make a difference which kind you use. Any adapter between 5- and 3-pin connectors will also work.
From the software’s perspective it doesn’t matter if you use splitters, boosters, or transmitters along the DMX line. The software does not directly control those devices and doesn’t even know they’re there.
Wall switches/panels are typically installed between the DMX interface and the lights. Lightkey is not aware of the wall switch and has no control over it. Most DMX wall switches work fine with Lightkey, but we cannot guarantee compatibility with specific devices.
Lightkey can receive MIDI from any controller, foot pedal, or other device. Some controllers have special, device-specific features like color LEDs which may not work or require manual configuration. See this article for more details.
Lightkey has been specially designed and optimized for Macs and can’t be used on other operating systems. At this time we have no plans for a Windows version.
The answer depends on many factors, so we can’t give you a simple answer here apart from the minimum system requirements. For example, a substantial project with many moving lights performing complex effects requires a more powerful GPU and CPU than a small setup with a few LED lights. If you run other major applications like Ableton Live or ProPresenter alongside Lightkey, it’s also advisable to have a decent CPU and plenty of RAM.
Please don’t ask us if a particular Mac configuration is suitable for your project—we cannot answer this. Instead we recommend that you download the free Lightkey edition and give it a try with your setup. Lightkey is a modern application highly optimized for Macs, so performance will not be an issue at all in most cases. You can use the built-in app Activity Monitor to compare Lightkey’s CPU usage to other applications.
Note: Even though Lightkey is very efficient, it has to constantly output DMX which prevents the CPU from going idle and increases energy consumption. We therefore recommend against running Lightkey on battery power.
Although we provide no iPhone or iPad version of Lightkey at this time, there are some third-party alternatives:
The software TouchOSC can be used to remote-control Lightkey through OSC or MIDI messages. It lets you to build custom control surfaces for iPhone or iPad which you can bind to arbitrary functions in Lightkey.
The iOS apps Duet and Luna Display let you turn an iPad into a second display for the Live view. This works great with Lightkey’s dual windows mode.
Please note that these are third-party solutions from other manufacturers. We have tested the integration with Lightkey at the time this article was written but cannot guarantee this functionality will work without errors and continue to work in the future.
No. We don’t track our users, so no data about your use of Lightkey is sent to us or anyone else. All project information and settings are stored locally on your Mac, and only there. (This also means we can’t retrieve this data if your computer is stolen or the disk fails, so please have a backup!)
We don’t know where you click, what fixtures you have, when you use the software or whether you use it at all. (As a consequence, if you buy a license but don’t use it for months, we can’t give you a refund afterwards.)
The only times when Lightkey connects to the Internet is for activation and when it checks for updates.
When you buy a license, we collect the data required for payment processing and invoicing, and when you activate it we log your IP address and a timestamp. No data is collected beyond that.
All relevant information is stored in your project file, so you only need to copy the project file to the new computer. It also contains copies of all fixture profiles used in the project.
Note that older Lightkey versions may not be able to open projects created by later versions, so be sure to use the same Lightkey version on both Macs.
If you don’t know the location of your project file: To locate the file, first close the current project. Then, in the startup screen, Control-click the project image near the bottom and select Show in Finder from the menu. Alternatively you can use Spotlight to search for files with the .lightkeyproj extension.
You can find all shortcuts and gestures in Appendix 1 of the Lightkey User Guide.
The Open Lighting Architecture (OLA) is an open-source software framework for sending and receiving DMX through numerous hardware interfaces and protocols. It is being developed by the Open Lighting Project. Note that Monospace is not affiliated with the Open Lighting Project.
The OLA “daemon” (olad) is installed on your Mac as a separate component by the Lightkey installer (you can even choose to install OLA alone). The OLA daemon is open-source software distributed under the GNU General Public License (a copy of the license is placed at /Library/Documentation/OLA); the source code is available from GitHub or our website. You can use OLA independently of Lightkey; see openlighting.org for more information.
Behind the scenes, Lightkey starts the OLA daemon and uses it to output DMX through USB or Ethernet interfaces. If you already have an instance of the OLA daemon running on your computer (e.g. a newer or self-compiled version), you can even configure Lightkey to use the existing daemon instead.
We are very open to feedback and a lot of the things we’ve added in past releases originate from user feedback. If you have a suggestion for future updates we’d love to hear about it.
It’s often useful if you include some background information about why you need a particular feature. This helps us understand the context of your request and can increase chances that it will be implemented.
Since we receive a lot of feedback, it may take time until we can realize something. Please do not expect a major feature to appear in the next update. And of course there’s no guarantee that we can implement every suggestion.
Here are some questions you should ask yourself to find the right DMX interface:
Do you need a single DMX universe or more?
Do you need an input port (e.g. to connect a DMX console for external control)?
Do you need galvanic isolation to protect your computer from power surges?
Do you need to cover long distances?
You can generally choose between USB and network interfaces.
USB interfaces: Lightkey works with USB interfaces from various manufacturers. Most USB interfaces can output a single DMX universe (an exception is the Enttec DMX USB Pro Mk2 with two output ports).
USB interfaces with a built-in microprocessor buffer the DMX data received from the computer. If they don’t receive new data they continue to send the last state. Some low-end devices do not have a microprocessor: If the computer is busy and fails to send new data fast enough, the interface sends out zero values, which can cause the lights to flicker.
Network interfaces: Network protocols can carry a large number of DMX universes, and Ethernet cabling or Wi-Fi are useful for covering long distances. If you want to output more than two universes you need to use a network interface.
Lightkey works with any interface that supports the Art-Net (versions 1 through 3), sACN (ANSI E1.31), or ESP Net protocols. An Ethernet network or Wi-Fi connects the interface to the computer. Art-Net, sACN, and ESP Net are standard protocols and any compatible interface will work with Lightkey, so we don’t recommend a particular brand or product.
Sometimes Lightkey may recognize a USB interface that’s not on the list of supported devices. That’s because some devices are based on the same microchips as others. Some of those devices are technically identical to a supported interface and will work, but others will not.
Important: There’s no guarantee that those DMX interfaces will work with Lightkey. Only the devices on this list have been tested by us and are guaranteed to work.
Usually this is not possible (there are a few exceptions, please contact us for details). To output multiple universes you should use a DMX interface with multiple output ports.
Lightkey needs an administrator password to communicate with the following USB interfaces:
Enttec Open DMX USB and similar interfaces
Eurolite USB-DMX512
Eurolite USB-DMX512-PRO MK2
Unless you have one of these devices, you can disable them in the DMX Output settings. You do this by enabling the Serial USB Interfaces output method.
You can use Art-Net or sACN to route Lightkey’s DMX output to a visualizer software like Capture. Here’s what you need to do to receive Art-Net data on the same computer:
Choose Lightkey > Manage Fixtures… and make sure the desired output universe(s) are patched to Art-Net.
Choose Lightkey > Settings… (or Preferences…) and then click DMX Output > Art-Net.
Select Manual and then select "Use loopback device”. This enables other applications on the same computer to receive Art-Net data.
Click Apply.
The visualizer software should now receive Art-Net data from Lightkey. Make sure it expects the data on the correct DMX universe.
If you use sACN, all you need to do is patch the desired output universe(s) to sACN.
Some DMX wall switches take over control from the primary controller when its output becomes zero on all channels. If your wall switch uses this behavior, enable the option “Set all channels to zero” in the General pane of Lightkey’s Settings (or Preferences) window. Lightkey will output zero on all channels before it quits or closes the project so your DMX wall switch can take control.
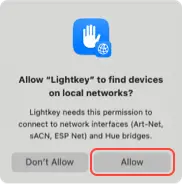
Starting with macOS 15 Sequoia, Lightkey requires permission to connect to network interfaces (Art-Net, sACN, ESP Net) and Hue bridges. When you see a request for permission to access devices on local networks, click Allow:
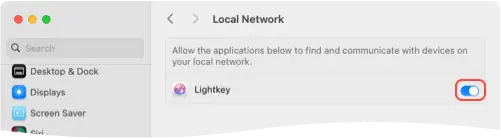
If you previously denied permission: The request for permission appears only once. If you clicked Don’t Allow, you can still grant permission in System Settings:
Quit Lightkey.
Go to System Settings > Privacy & Security > Local Network.
Set the switch next to Lightkey to on:
Open Lightkey again.
If you don’t see a prompt for permission: Try to quit and reopen Lightkey a few times.
If you previously granted permission but there’s no output to network interfaces or Hue bridges: Try to disable and re-enable the permission in System Settings, as shown above.
Update to the latest macOS. The reliability of the permissions system has improved significantly starting with macOS 15.3.
A DMX fixture is controlled through a range of channels which map to individual features of the light. The fixture profile tells Lightkey the function of each channel and the meaning of its values. It is created from the DMX chart provided by the fixture manufacturer.
Use the right profile for your fixture. To control a DMX fixture you need a profile which exactly matches your fixture. Profiles for slightly different models often won’t work because their channels map to different features, which can lead to a completely different fixture behavior.
Lightkey’s fixture library is organzed by manufacturer and model name. The model name generally matches name on the cover page of the fixture manual.
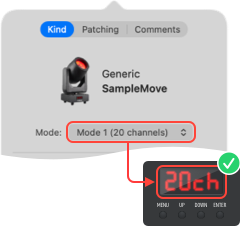
Does the mode match? Many fixture profiles contain multiple modes or “personalities”. It’s important that you select the same mode on the fixture and in Lightkey. Otherwise the channels won’t match and you may get a completely different fixture behavior.
A DMX fixture is controlled through a range of channels which map to individual features of the light. The DMX chart (or “DMX protocol”) describes the function of each channel and the meaning of its values.
Every fixture has a DMX chart. It’s usually part of the manual and comes with the fixture or can be found on the manufacturer’s website. The DMX chart is the basis for the fixture profile.
If a fixture doesn’t behave as it should you can debug the problem by comparing the output channel values to the DMX chart.
If you don’t have a DMX chart: Reach out to the fixture manufacturer or search the web for the fixture manual. We cannot obtain this information for you. Please do not generate a DMX chart with AI; this leads to wrong results in most cases.
If you can’t find your fixtures in the built-in library, we recommend the following:
Does it work with a generic profile? Some simple fixtures work with one of the generic profiles in the library. This includes conventional lights with a single dimmer channel, dimmer and switch packs, many LED strips, and single-channel fog machines. You can find an overview of the generic profiles in the appendix of the Lightkey User Guide.
Search the online fixture library. It contains high-quality profiles in Lightkey’s native format and is updated more often than the application.
Request a fixture profile. We can create a profile for your fixture if you send us the necessary information. We need the fixture’s DMX chart (usually part of the fixture manual and/or available for download from the manufacturer website) and the manufacturer and model name.
Create or import a profile. Create your own profile with Lightkey’s built-in fixture editor or import a profile in the formats SSL2 (Sunlite) or PFF/FXT (DMX FreeStyler). Imported fixture profiles may need a bit of editing in the fixture editor before they work correctly with Lightkey.
When you connect conventional lights through a dimmer or switch pack, you should patch several of the generic one-channel profiles—e.g. PAR Wash, PAR Spot, Bulb, Switch, depending on what you connect to the dimmer pack—to consecutive DMX channels. This way each light appears as an individual fixture in the Preview and you don’t need a custom fixture profile for the dimmer pack. The DMX address of the first light should match the address of the dimmer pack.
Example: A dimmer pack with DMX address 90 controls four wash lights. In this case, patch the generic profile PAR Wash four times to channels 90, 91, 92, and 93.
Most decoders for LED strips work with one of the generic fixture profiles in the built-in library, so you do not need a custom profile. You can find an overview of the generic profiles in the appendix of the Lightkey User Guide. See the documentation of your LED decoder to find out which channel layout it uses.
Example: A decoder with eight outputs and an RGBW channel layout occupies 8 × 4 = 32 DMX channels. Patch the generic profile “LED Strip (RGBW)” eight times to consecutive channels. The DMX address of the first LED strip must match the address of the decoder.
Absolutely. Lightkey includes a powerful, easy-to-use fixture editor built right in the application. This way you can quickly jump to a fixture’s profile and don’t need to restart the app after making changes. We recommend that you look at profiles for similar lights to learn about the fixture editor.
Lightkey can control bulbs, LED strips, plugs, and other types of lights of the Philips Hue brand. Products by other manufacturers which connect to a Philips Hue bridge will often work as well, but we can’t guarantee compatibility with them. Other smart light systems, including WiZ lights, are not currently supported.
Smart light switches for Philips Hue lights will continue to work when you control your smart lights with Lightkey. Note that when you operate the switch while using Lightkey the lights won’t change in Lightkey’s Preview, so it’s best to use light switches only when Lightkey isn’t running.
Lightkey sends MIDI feedback messages to any connected controller, enabling it to reflect the current software state through LEDs, motorized knobs or faders, etc. Beyond that, some controllers provide extended feedback options like multi-color LEDs. These features are controlled through custom protocols and require special software support. The following list shows the controllers for which Lightkey currently supports extended feedback.
| Controller | Extended feedback |
|---|---|
| Akai APC mini | dual-color feedback |
| Akai APC mini mk2 | multi-color feedback |
| Akai APC20 | dual-color feedback |
| Akai APC40 | dual-color feedback |
| Akai APC40 mkII | multi-color feedback |
| Behringer X-Touch | scribble strips, 7-segment display |
| Behringer X-Touch Extender | scribble strips |
| Native Instruments Traktor Kontrol F1 | multi-color feedback |
| Novation Launchpad | dual-color feedback |
| Novation Launchpad Mini | dual-color feedback |
| Novation Launchpad Mini MK3 | multi-color feedback |
| Novation Launchpad MK2 | multi-color feedback |
| Novation Launchpad Pro | multi-color feedback |
| Novation Launchpad X | multi-color feedback |
Note: If your MIDI controller offers special feedback options which aren’t supported by Lightkey, you can customize the feedback messages in the External Control window.
To enable feedback LEDs on the Akai LPD8 controller, do the following:
To use a Behringer X-Touch with Lightkey, connect the controller to your Mac with a USB cable. Then select the following settings in the configuration menu, as explained in the X-Touch Quick Start Guide:
(If the Ctrl mode is not available you need to update the firmware on your X-Touch controller.)
The faders on the X-Touch send two types of MIDI messages: A Note On message when touching the fader’s knob and CC messages as the fader is being dragged. Therefore you can’t use the Add Trigger… command to quickly assign faders to a fader-type button, as Lightkey would identify the control as a button. Instead, create the binding in the External Control window:
Unfortunately the X-Touch does not send 14-bit fader values in Ctrl mode.
You can assign an action to the jog wheel in the External Control window. By default the direction is reversed; select the Inverted option to correct this.
You can set up the push buttons on a Behringer BCF2000 MIDI controller so their LED reflects the current state of the binding: For example, the LED is on when the corresponding cue is active, and off otherwise.
Program the push button (Edit button) with the following options:
The faders on a Behringer BCF2000 can send high-resolution 14-bit values to Lightkey. In this case each fader has a range of 16384 steps as opposed to 128 steps for standard resolution.
Program the fader (Edit button) with the following options:
For more information see the Behringer BCF2000 User Guide.
To use a Traktor Kontrol F1 controller with Lightkey, you need to put the controller in MIDI Mode. Please follow the steps in section 4.12 of the Traktor Kontrol F1 Manual.
Multicolor feedback requires that the Color Mode is set to HSB. This can be done in the Controller Editor app by Native Instruments.
To enable MIDI feedback to the Traktor Kontrol F1, some additional setup is necessary in Lightkey’s DMX Output settings:
Choose Lightkey > Settings… (or Preferences…) and then click External Control.
Locate the output to your controller in the list and make sure it is enabled.
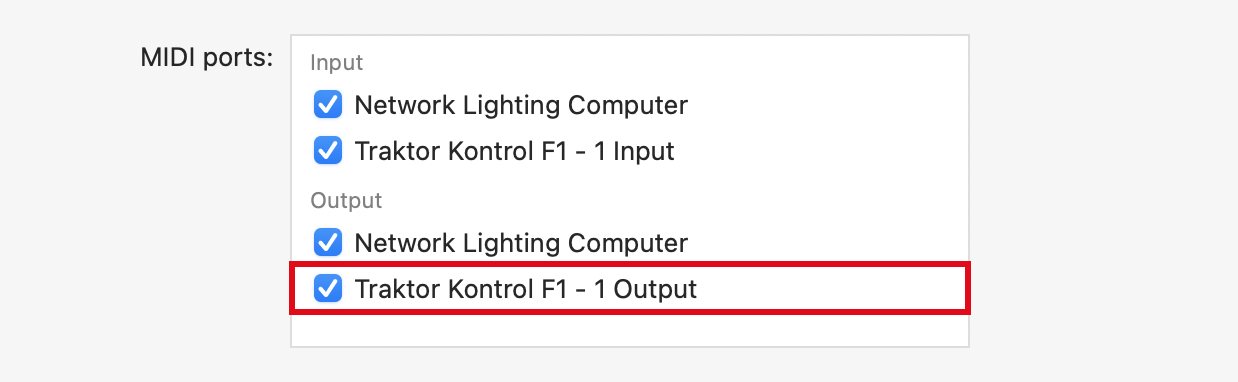
Control-click the input from your controller, select Send Feedback To, and then select the controller’s output.

Elgato Stream Deck is a popular USB controller which lets you perform various kinds of actions through a grid of freely assignable keys. You can use Stream Deck to trigger cues and other actions in Lightkey by means of either OSC or MIDI messages.
OSC (Open Sound Control) is a quick and convenient way to trigger actions in Lightkey. You need a Stream Deck plug-in for sending OSC messages; simply search the Stream Deck Store for “OSC”. Follow these steps to toggle a cue from Stream Deck:
Install a Stream Deck plug-in which enables the sending of OSC messages.
In Lightkey, control-click a cue in the Live view and choose External Control > Copy OSC Address from the menu.
In the Stream Deck app, drag the OSC action from the actions list to a key.
Configure the action as follows:
Use 127.0.0.1 as the destination address. This corresponds to your Mac.
Set the destination port to 21600.
In the address field, paste the OSC address from the clipboard. Then replace the word “activate” with “toggle”. The result should look like this:
/live/My_Control_Panel/cue/My_Cue_Name/toggleThe action’s value controls the fade time of the cue. For example, a value of 1 results in a 1 second fade.
Press the key on your Stream Deck. Each press should now toggle the cue’s state.
Many other elements in Lightkey have an OSC address—for example, the Blind Mode and Freeze buttons in the toolbar. You can find more information and the complete OSC dictionary in the Lightkey User Guide.
When you use MIDI (Musical Instrument Digital Interface), you bind a MIDI message (trigger) to a particular action, such as activating a cue. Lightkey can send MIDI feedback so the key on the Stream Deck will always reflect the cue’s state.
You need a Stream Deck plug-in for sending MIDI messages; simply search the Stream Deck Store for “MIDI”. Here’s how to toggle a cue from Stream Deck, including feedback when the cue changes in Lightkey:
Like with OSC, you can trigger many more actions in Lightkey through MIDI. You can view and edit all assigned MIDI triggers in the External Control window. For more information refer to the Lightkey User Guide.
It’s easy to receive MIDI commands in Lightkey from other apps on the same Mac, e.g. Ableton Live or ProPresenter. If the sending app is on another computer, you need to route the MIDI commands over a local network. This is done with the app Audio MIDI Setup that comes with every Mac.
Note: If you use Live Triggers, Lightkey and Ableton Live must be on the same Mac while you create your projects. This is necessary so Lightkey can add clips to the Ableton Live library. But after everything has been set up you can run the show from separate computers.
Open Audio MIDI Setup and choose Window > Show MIDI Studio.
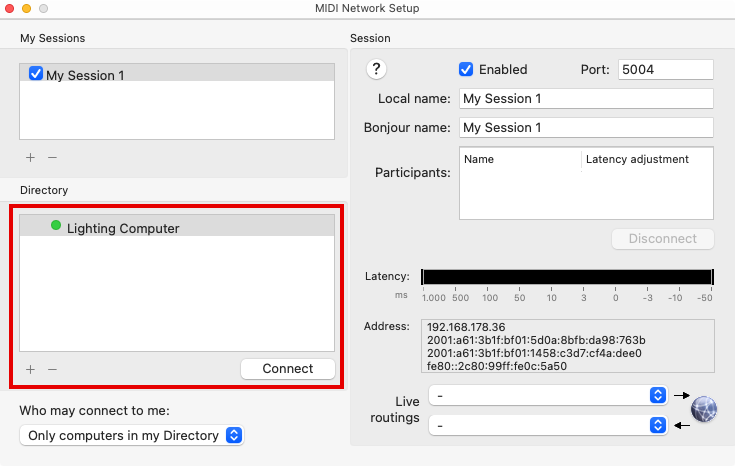
Choose MIDI Studio > Open MIDI Network Setup… to open the MIDI Network Setup window.
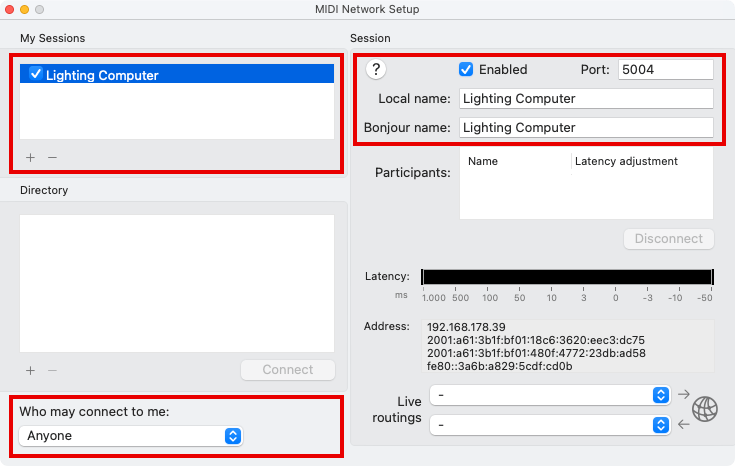
Click “+” in the My Sessions section. This creates a “session” which other computers can connect to.
On the right side of the window, change the local name and Bonjour name of the session. The Bonjour name will be visible to other computers.
Make sure the Enabled checkbox is selected.
Select “Anyone” in the menu “Who may connect to me”.
To verify that Lightkey is connected to the session, open Lightkey’s Settings (or Preferences) window, click External Control, and check if the network session is selected under Input.
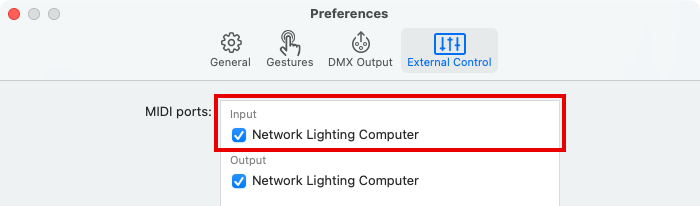
Repeat the above steps to create a session in Audio MIDI Setup.
In the Directory section, select the session you first created on the destination computer.
Click Connect. The two computers are now connected so MIDI can be transmitted between them.
In the software which you want to use to send MIDI, select the network session as destination. In Ableton Live this is done in the Preferences window > Link, Tempo & MIDI.
The Consolidate feature in Ableton Live can be used to merge multiple clips into one. This is particularly useful when you want to transfer a clip to Session view.
You can use this command with Live Triggers, but only for cues on the same Live page.
Here’s a collection of helpful tips:
First of all, check if your interface is on the list of supported interfaces. Other interfaces may not work with Lightkey.
Go to the DMX Output pane of Lightkey’s Settings (or Preferences) window and make sure the correct output option for your interface is enabled. The first three options are mutually exclusive, so only one of them can be enabled at any time.
| To use this DMX interface… | …enable this option |
|---|---|
| Enttec Open DMX USB | Open DMX Interfaces |
| Eurolite USB-DMX512 | Open DMX Interfaces |
| Eurolite USB-DMX512-PRO Cable | Eurolite PRO |
| Eurolite USB-DMX512-PRO MK2 | Eurolite PRO |
| Any other USB interface | Serial USB Interfaces |
If a wrong option was initially enabled, macOS may have associated your interface with the wrong device driver. In this case it helps to unplug the DMX interface and replug it after about one minute. If this doesn’t help then you should restart your Mac.
There may be conflicts if other applications try to access your DMX interface. Please quit all other lighting control applications, then choose Lightkey > Reset DMX Output from the menu bar. If your interface still doesn’t appear, restart your computer and then open Lightkey again.
Lightkey can find most Art-Net nodes automatically. Follow these steps:
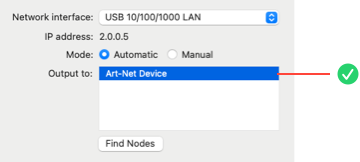
Once Lightkey knows which node to send Art-Net data to, you also need to patch the universe(s) to Art-Net:
![]()
Connect the Art-Net interface directly to the Mac with an Ethernet cable. There should be no router between the computer and the Art-Net interface. It may help to disable other network interfaces in the Network pane of System Settings.
Assign your computer a static IP address. The is done in the Network pane of System Settings. If the Art-Net node is directly connected to the computer, DHCP is not being used.
You can find more information about choosing the IP address in the node’s documentation. Some Art-Net nodes require the address to begin with “2” or “10”, for example. The computer’s IP address must be different from that of the Art-Net node, and the computer must be on the same IP subnet as the node.
Starting with macOS 15, Lightkey requires permission to connect to Art-Net interfaces. Make sure that you allow access to devices on local networks, as explained here.
Even if you have granted permission, it may help to disable and re-enable the setting in System Settings.
Check with the manufacturer if a firmware update is available for your interface.
Reset your interface to factory settings (see device documentation).
Art-Net universe numbers start at 0. However, some Art-Net interfaces (e.g. DMXking eDMX) display universe numbers which start at 1 and are therefore offset by one from those in Lightkey. In this case you must add 1 to Lighkey’s universe numbers when you configure your Art-Net node.
Here’s a screenshot from the eDMX Configuration utility:
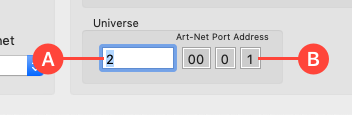
(A) 1-based universe number. (B) 0-based universe number; this must match the Art-Net universe number in Lightkey.
If you see no response from some or all of your lights there are many possible causes. The following steps should help you track down the problem.
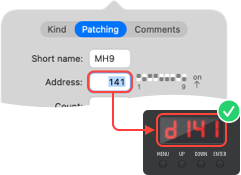
Do the DMX addresses and modes match? The first step should be to ensure the DMX addresses assigned to your fixtures match the addresses in Lightkey. If your fixtures have multiple operation modes, the mode must match as well.
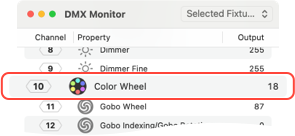
Is Lightkey sending DMX to the fixtures? Choose Window > DMX Monitor (or DMX Output) from the menu bar to see Lightkey’s DMX output. At least some of the channels occupied by your fixtures should show non-zero values.
![]()
Is the Master Dimmer open? The Master Dimmer slider on the left of the Live view affects all dimmable lights. Make sure it’s not closed.
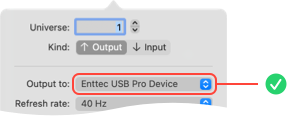
Is the universe patched to a DMX interface or network protocol? Choose Lightkey > Manage Fixtures… from the menu bar, then double-click a universe near the top:
Art-Net: Can Lightkey find your node? When using Art-Net, verify that Lightkey is (still) able to find your node, as described here.
Art-Net or sACN: Does the universe match? When using Art-Net or sACN, the node must be set to the same universe number as Lightkey. See your node’s documentation on how to change the universe.
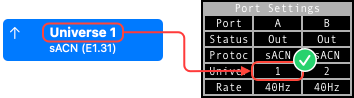
Note that some Art-Net nodes (e.g. DMXking eDMX) display universe numbers which are offset by one from Lightkey’s.
If your fixtures still don’t respond: The next step is to look for errors on the hardware or electrical level. Possible causes include faulty or unsuitable DMX cables, a single faulty fixture in the DMX chain, or a defective DMX interface.
Check the following points if you try to turn a fixture on but all of its channels show zero values in the DMX Monitor.
![]()
Is your Lightkey license active? To see the state of your license, choose Lightkey > About Lightkey from the menu bar.
Is the fixture within the active channels? The number of active output channels depends on your license. Fixtures outside the active channels appear gray in the Fixture Manager.
Has DMX output to the fixture been disabled? See “Disable fixtures” in chapter 13, “Manage DMX fixtures”, of the Lightkey User Guide.
This guide helps you if your lights generally react to commands from Lightkey but their behavior isn’t as expected. For example: A fixture is constantly strobing, shows wrong colors, or spins permanently. Follow the steps from top to bottom to track down the issue.
Is the unwanted behavior also visible in the Preview? This question helps you distinguish between problems in the project or elsewhere.
If yes: A fixture’s behavior is determined by active cues and presets, overridden fixture properties, and default property values. It often helps to review the active cues and the fixture properties they define. If you can’t track down the problem, send us a message with your project file and the steps required to reproduce the problem.
In this case you can ignore the following steps.
If not: Proceed to the next step.
Do the DMX addresses and modes match? Make sure the DMX addresses assigned to the fixtures match the addresses in Lightkey. If your fixtures have multiple operation modes, the mode must match as well.
Are you using the right fixture profile? If a fixture’s behavior differs from the Preview, the cause is often found in the fixture profile.
If you’re using a profile from the built-in library or our online fixture library: Verify that the fixture name exactly matches your fixture. Profiles for a slightly different fixture model often won’t work.
If you’re using a profile from a different source: We recommend that you use our free fixture profile service to get a verified, professionally created profile.
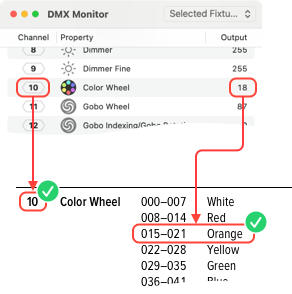
Verify Lightkey’s DMX output to the fixture. Select a fixture in the Preview and choose Fixture > Show DMX Output from the menu bar. Then check if the DMX output matches the expected fixture state by comparing the channels and their values to the DMX chart in the fixture manual.
How to verify the DMX output to a fixture
If you think the DMX output is wrong: If the fixture profile is from the built-in library, send us a message and tell us which channel(s) is/are incorrect, what the channel values are and which values you expected instead. It may help to include the DMX chart because sometimes there are multiple DMX chart revisions for the same fixture.
If the DMX output matches the DMX chart but the fixture still shows a different behavior: In this case either the DMX chart is wrong or the fixture isn’t working correctly. We recommend that you contact the fixture manufacturer for assistance. For example, an updated or corrected version of the DMX chart may be available.
If a fixture’s behavior doesn’t match what you see in the Preview, verifying Lightkey’s DMX output often helps to track down the problem. To see the DMX output to the fixture, select a single fixture in the Preview and choose Fixture > Show DMX Output from the menu bar.
For example, here’s how to proceed if a fixture has the wrong color:
Select a color in the Design view and observe which channel changes its output value.
Compare the channel number and value to the DMX chart in the fixture manual. Is this the correct channel for controlling the color? Does the value match the color you selected in the Design view?
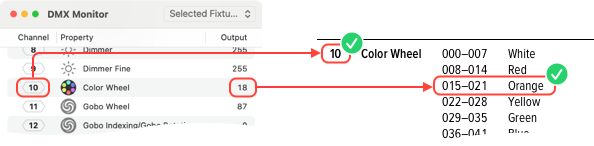
Here, channel 10 controls the color wheel, and the value 18 is within the range of the selected color, so the output is correct.
It’s advisable to also look at other channels which might affect the fixture’s behavior. For example, if a fixture has multiple color wheels you should check their channels as well.
Write us a message and we’ll get back to you as soon as possible.