Can’t find your answer?
Write us a message and we’ll get back to you as soon as possible.
Contact UsLightkey sends MIDI feedback messages to any connected controller, enabling it to reflect the current software state through LEDs, motorized knobs or faders, etc. Beyond that, some controllers provide extended feedback options like multi-color LEDs. These features are controlled through custom protocols and require special software support. The following list shows the controllers for which Lightkey currently supports extended feedback.
| Controller | Extended feedback |
|---|---|
| Akai APC mini | dual-color feedback |
| Akai APC mini mk2 | multi-color feedback |
| Akai APC20 | dual-color feedback |
| Akai APC40 | dual-color feedback |
| Akai APC40 mkII | multi-color feedback |
| Behringer X-Touch | scribble strips, 7-segment display |
| Behringer X-Touch Extender | scribble strips |
| Native Instruments Traktor Kontrol F1 | multi-color feedback |
| Novation Launchpad | dual-color feedback |
| Novation Launchpad Mini | dual-color feedback |
| Novation Launchpad Mini MK3 | multi-color feedback |
| Novation Launchpad MK2 | multi-color feedback |
| Novation Launchpad Pro | multi-color feedback |
| Novation Launchpad X | multi-color feedback |
Note: If your MIDI controller offers special feedback options which aren’t supported by Lightkey, you can customize the feedback messages in the External Control window.
To enable feedback LEDs on the Akai LPD8 controller, do the following:
To use a Behringer X-Touch with Lightkey, connect the controller to your Mac with a USB cable. Then select the following settings in the configuration menu, as explained in the X-Touch Quick Start Guide:
(If the Ctrl mode is not available you need to update the firmware on your X-Touch controller.)
The faders on the X-Touch send two types of MIDI messages: A Note On message when touching the fader’s knob and CC messages as the fader is being dragged. Therefore you can’t use the Add Trigger… command to quickly assign faders to a fader-type button, as Lightkey would identify the control as a button. Instead, create the binding in the External Control window:
Unfortunately the X-Touch does not send 14-bit fader values in Ctrl mode.
You can assign an action to the jog wheel in the External Control window. By default the direction is reversed; select the Inverted option to correct this.
You can set up the push buttons on a Behringer BCF2000 MIDI controller so their LED reflects the current state of the binding: For example, the LED is on when the corresponding cue is active, and off otherwise.
Program the push button (Edit button) with the following options:
The faders on a Behringer BCF2000 can send high-resolution 14-bit values to Lightkey. In this case each fader has a range of 16384 steps as opposed to 128 steps for standard resolution.
Program the fader (Edit button) with the following options:
For more information see the Behringer BCF2000 User Guide.
To use a Traktor Kontrol F1 controller with Lightkey, you need to put the controller in MIDI Mode. Please follow the steps in section 4.12 of the Traktor Kontrol F1 Manual.
Multicolor feedback requires that the Color Mode is set to HSB. This can be done in the Controller Editor app by Native Instruments.
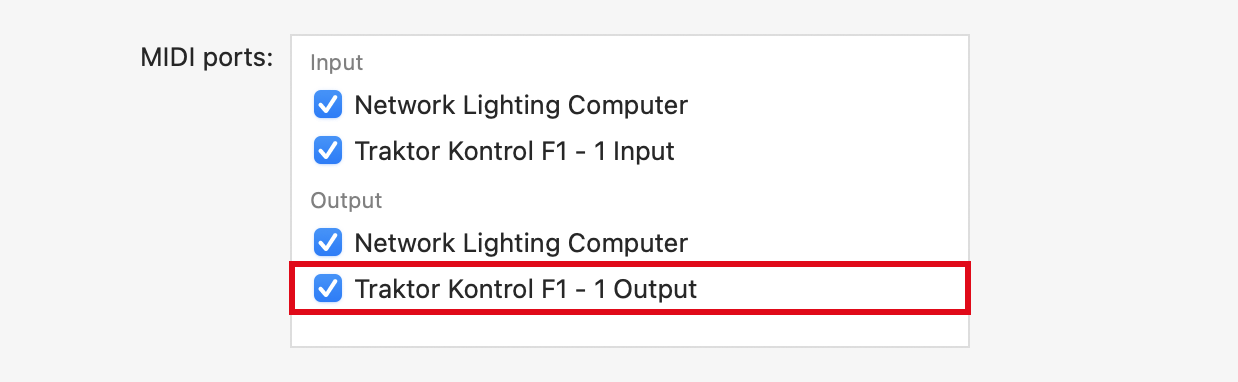
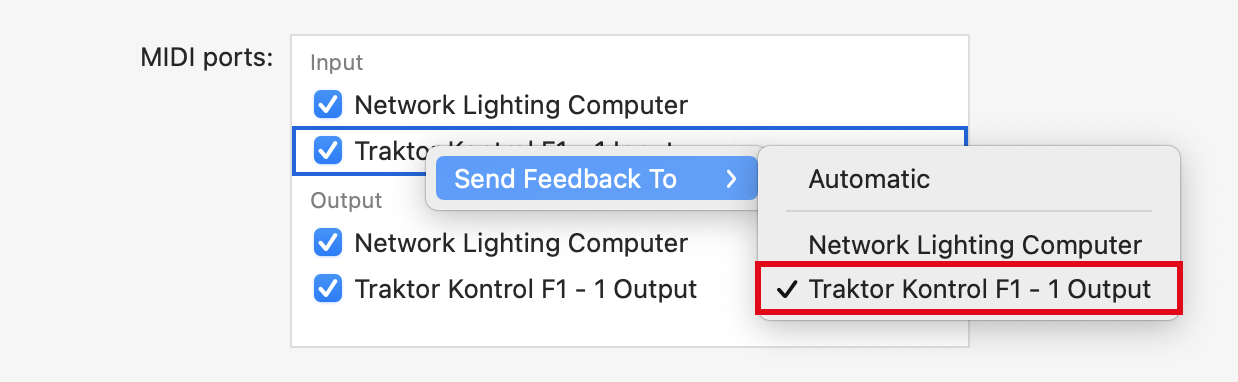
To enable MIDI feedback to the Traktor Kontrol F1, some additional setup is necessary in Lightkey’s DMX Output settings:
Choose Lightkey > Settings… (or Preferences…) and then click External Control.
Locate the output to your controller in the list and make sure it is enabled.
Control-click the input from your controller, select Send Feedback To, and then select the controller’s output.
Elgato Stream Deck is a popular USB controller which lets you perform various kinds of actions through a grid of freely assignable keys. You can use Stream Deck to trigger cues and other actions in Lightkey by means of either OSC or MIDI messages.
OSC (Open Sound Control) is a quick and convenient way to trigger actions in Lightkey. You need a Stream Deck plug-in for sending OSC messages; simply search the Stream Deck Store for “OSC”. Follow these steps to toggle a cue from Stream Deck:
Install a Stream Deck plug-in which enables the sending of OSC messages.
In Lightkey, control-click a cue in the Live view and choose External Control > Copy OSC Address from the menu.
In the Stream Deck app, drag the OSC action from the actions list to a key.
Configure the action as follows:
Use 127.0.0.1 as the destination address. This corresponds to your Mac.
Set the destination port to 21600.
In the address field, paste the OSC address from the clipboard. Then replace the word “activate” with “toggle”. The result should look like this:
/live/My_Control_Panel/cue/My_Cue_Name/toggleThe action’s value controls the fade time of the cue. For example, a value of 1 results in a 1 second fade.
Press the key on your Stream Deck. Each press should now toggle the cue’s state.
Many other elements in Lightkey have an OSC address—for example, the Blind Mode and Freeze buttons in the toolbar. You can find more information and the complete OSC dictionary in the Lightkey User Guide.
When you use MIDI (Musical Instrument Digital Interface), you bind a MIDI message (trigger) to a particular action, such as activating a cue. Lightkey can send MIDI feedback so the key on the Stream Deck will always reflect the cue’s state.
You need a Stream Deck plug-in for sending MIDI messages; simply search the Stream Deck Store for “MIDI”. Here’s how to toggle a cue from Stream Deck, including feedback when the cue changes in Lightkey:
Like with OSC, you can trigger many more actions in Lightkey through MIDI. You can view and edit all assigned MIDI triggers in the External Control window. For more information refer to the Lightkey User Guide.
It’s easy to receive MIDI commands in Lightkey from other apps on the same Mac, e.g. Ableton Live or ProPresenter. If the sending app is on another computer, you need to route the MIDI commands over a local network. This is done with the app Audio MIDI Setup that comes with every Mac.
Note: If you use Live Triggers, Lightkey and Ableton Live must be on the same Mac while you create your projects. This is necessary so Lightkey can add clips to the Ableton Live library. But after everything has been set up you can run the show from separate computers.
Open Audio MIDI Setup and choose Window > Show MIDI Studio.
Choose MIDI Studio > Open MIDI Network Setup… to open the MIDI Network Setup window.
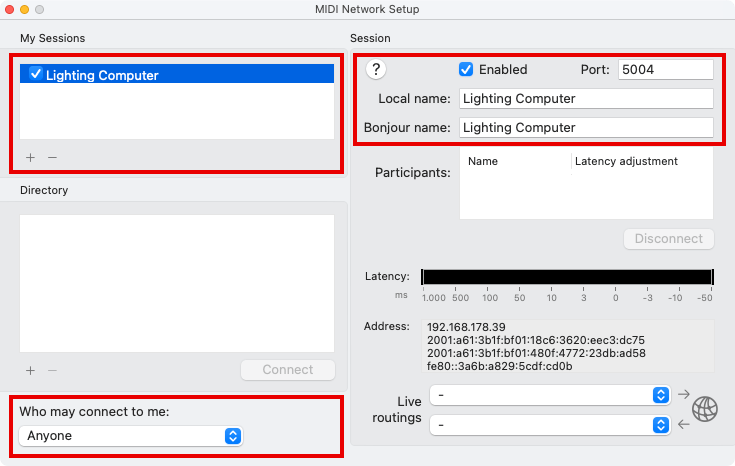
Click “+” in the My Sessions section. This creates a “session” which other computers can connect to.
On the right side of the window, change the local name and Bonjour name of the session. The Bonjour name will be visible to other computers.
Make sure the Enabled checkbox is selected.
Select “Anyone” in the menu “Who may connect to me”.
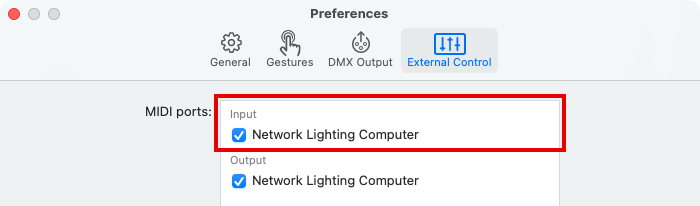
To verify that Lightkey is connected to the session, open Lightkey’s Settings (or Preferences) window, click External Control, and check if the network session is selected under Input.
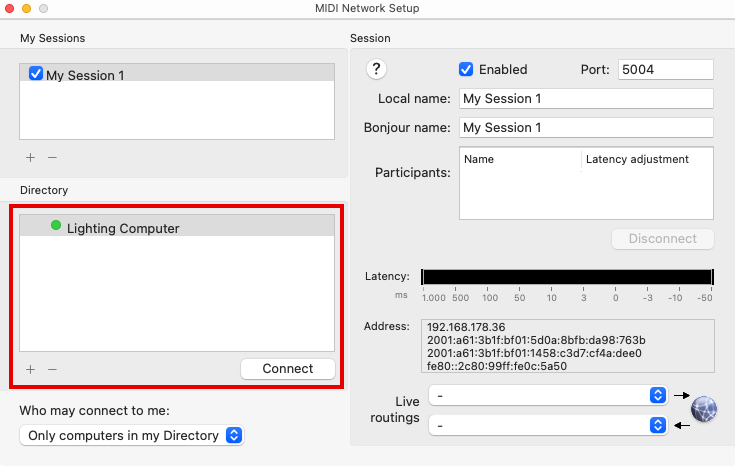
Repeat the above steps to create a session in Audio MIDI Setup.
In the Directory section, select the session you first created on the destination computer.
Click Connect. The two computers are now connected so MIDI can be transmitted between them.
In the software which you want to use to send MIDI, select the network session as destination. In Ableton Live this is done in the Preferences window > Link, Tempo & MIDI.
The Consolidate feature in Ableton Live can be used to merge multiple clips into one. This is particularly useful when you want to transfer a clip to Session view.
You can use this command with Live Triggers, but only for cues on the same Live page.
Write us a message and we’ll get back to you as soon as possible.
Contact Us